Blacked out headlights

**** PLEASE USE SUBTOPICS BELOW FOR NEW TOPICS ****

Moderator: volvite

User avatar
GOTGOO
Sponsored Member
Posts: 387
Joined: Wed Dec 24, 2008 9:15 pm
Location: St.Louis, MO

Blacked out headlights

Postby GOTGOO » Fri Nov 13, 2009 3:14 pm

What do you guys think?
Image
Image
Image


KEVSTER
Posts: 401
Joined: Sun Oct 12, 2008 8:21 pm

Postby KEVSTER » Fri Nov 13, 2009 4:29 pm

WOW! Now that is different, not sure... kinda nice. how did you do this? take the headlamp apart? what type of paint..

User avatar
GOTGOO
Sponsored Member
Posts: 387
Joined: Wed Dec 24, 2008 9:15 pm
Location: St.Louis, MO

Postby GOTGOO » Fri Nov 13, 2009 4:37 pm

I took it all apart and preped everything i wanted to paint and just used some flat black rustoleum. I will never do this again it was the biggest pain in the a$$! Oh dont ever use vht night shades on the reflectors like i did cause it turns out its tinted red only a minor set back just wont use my corner running lights lol.

Npath
Posts: 356
Joined: Wed May 21, 2008 10:20 pm
Location: Vancouver, Canada

Re: Blacked out headlights

Postby Npath » Fri Nov 13, 2009 9:18 pm

I'd prefer to spend my time installing a cold air intake.

Sorry, tinting turn signals is silly, in my opinion. :o)

User avatar
GOTGOO
Sponsored Member
Posts: 387
Joined: Wed Dec 24, 2008 9:15 pm
Location: St.Louis, MO

Postby GOTGOO » Sat Nov 14, 2009 2:18 am

I have one of those :)! I just wanted my headlights to match my grill. I agree tinting the amber lens was silly, but you live and learn its not the end of the world. I still like them and with the lens for the blinker removed you can have a clear turn signal, but i went for some amber bulbs that look kinda silverish/blue when there off.

User avatar
Captain
Sponsored Member
Posts: 692
Joined: Wed Mar 19, 2008 7:41 pm
Location: S.w. Chicago

Postby Captain » Sat Nov 14, 2009 6:36 am

Very nice. I realy like the look on the PF. becuase yours is smoked out witht the grill. Good look for you :D

kev1n
Posts: 181
Joined: Sun Jan 04, 2009 5:04 pm

Postby kev1n » Sat Nov 14, 2009 8:29 am

What did you use to stealth out the rims ? I was thinking of going gunmetal on mine or maybe black not sure yet. The LE stock rims aren't all that.

User avatar
GOTGOO
Sponsored Member
Posts: 387
Joined: Wed Dec 24, 2008 9:15 pm
Location: St.Louis, MO

Postby GOTGOO » Sat Nov 14, 2009 10:25 am

Captain caveman wrote:Very nice. I realy like the look on the PF. becuase yours is smoked out witht the grill. Good look for you :D
Thanks!
kev1n wrote:What did you use to stealth out the rims ? I was thinking of going gunmetal on mine or maybe black not sure yet. The LE stock rims aren't all that.
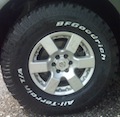
I used duplicolor HWP104 Satin Black wheel paint and duplicolor wheel clear.

Citcope
Posts: 127
Joined: Wed Jul 09, 2008 3:17 pm
Location: Northern Virginia

Postby Citcope » Sun Nov 15, 2009 12:46 pm

how did you do the grill? did you just take it out and paint it? What kind of paint did you use? I think the grill and the headlights look nice all blacked out like that. Good job. :mrgreen:

User avatar
GOTGOO
Sponsored Member
Posts: 387
Joined: Wed Dec 24, 2008 9:15 pm
Location: St.Louis, MO

Postby GOTGOO » Sun Nov 15, 2009 5:29 pm

Citcope wrote:how did you do the grill? did you just take it out and paint it? What kind of paint did you use? I think the grill and the headlights look nice all blacked out like that. Good job. :mrgreen:
Thanks! I used the same method i used on the lights as far as paint and prep go. I took the grill out and seperated the chrome half from the egg crate looking part when i painted it.

User avatar
VenezuelanPath
Posts: 44
Joined: Sun Oct 18, 2009 9:49 am
Location: Miami

Postby VenezuelanPath » Sun Nov 15, 2009 7:07 pm

It looks excellent, now this is one more in my to do list

great looking truck

User avatar
GOTGOO
Sponsored Member
Posts: 387
Joined: Wed Dec 24, 2008 9:15 pm
Location: St.Louis, MO

Postby GOTGOO » Mon Nov 16, 2009 12:43 am

VenezuelanPath wrote:It looks excellent, now this is one more in my to do list

great looking truck
Thank you

Citcope
Posts: 127
Joined: Wed Jul 09, 2008 3:17 pm
Location: Northern Virginia

Postby Citcope » Mon Nov 16, 2009 8:37 pm

I did this once to my old Mazda protege and i had to place my headlight in the oven for a bit to get the seal to melt enough for me to take it apart. I sanded around the lens and then painted it black. To put it all back together i placed it back in the oven to get the sealant to once again melt enough to get the good seal again.

How did you do this for the Path? what did you have to do with the seal?

User avatar
GOTGOO
Sponsored Member
Posts: 387
Joined: Wed Dec 24, 2008 9:15 pm
Location: St.Louis, MO

Postby GOTGOO » Tue Nov 17, 2009 12:13 am

Citcope wrote:I did this once to my old Mazda protege and i had to place my headlight in the oven for a bit to get the seal to melt enough for me to take it apart. I sanded around the lens and then painted it black. To put it all back together i placed it back in the oven to get the sealant to once again melt enough to get the good seal again.

How did you do this for the Path? what did you have to do with the seal?
I put a damp towel on a cookie sheet put the headlight on it baked for about 11min at 250* and just pryed around the clips till there was enough to grab and pull it off. you also have to take 4 screws and the rubber seal for the light out of the back before you bake. When i put it back together i left all the sealer on both sides pushed them together then baked again.... after that you can push it the rest of the way down and put the screws in while its still gooey. Try not to distort anything when its all hot.

User avatar
VenezuelanPath
Posts: 44
Joined: Sun Oct 18, 2009 9:49 am
Location: Miami

Postby VenezuelanPath » Wed Nov 18, 2009 12:16 pm

I did this once to my old Mazda protege and i had to place my headlight in the oven for a bit to get the seal to melt enough for me to take it apart. I sanded around the lens and then painted it black. To put it all back together i placed it back in the oven to get the sealant to once again melt enough to get the good seal again.

How did you do this for the Path? what did you have to do with the seal?


I put a damp towel on a cookie sheet put the headlight on it baked for about 11min at 250* and just pryed around the clips till there was enough to grab and pull it off. you also have to take 4 screws and the rubber seal for the light out of the back before you bake. When i put it back together i left all the sealer on both sides pushed them together then baked again.... after that you can push it the rest of the way down and put the screws in while its still gooey. Try not to distort anything when its all hot.
If we open the headlight sealed compartment, is that going yo make it less water proof?? I do a lot of off-road driving (water up the hood) so I already have some fog inside of them, but im scared that by opening them, they would loose the waterproofness.

Is there a silicone or some sort of seal glue the handles the heat???


Return to “2005-2012 Pathfinder (R51)”