Home made roof rack

**** PLEASE USE SUBTOPICS BELOW FOR NEW TOPICS ****

Moderator: volvite

User avatar
GOTGOO
Sponsored Member
Posts: 387
Joined: Wed Dec 24, 2008 9:15 pm
Location: St.Louis, MO

Home made roof rack

Postby GOTGOO » Wed Dec 30, 2009 12:25 am

Well i'm 21 and broke, but I have a welder so i used it! The most exspensive part of this whole thing was the two middle lights.... Everything else we had in our garage. Its not totaly finished yet i'm still working on a wind deflector for the front and a cover for the rear bar to make it easier on the eyes.
Image
Image
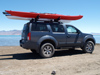
Still need to paint those silver parts you see black.
Image
I don't need the strap, but its not hurting anything.
Image
Spare hold down made out of two U-dolts welded together.
Image
Image
Image


User avatar
GOTGOO
Sponsored Member
Posts: 387
Joined: Wed Dec 24, 2008 9:15 pm
Location: St.Louis, MO

Postby GOTGOO » Wed Dec 30, 2009 12:29 am

Forgot this one to show its low profileness!
Image

User avatar
VenezuelanPath
Posts: 44
Joined: Sun Oct 18, 2009 9:49 am
Location: Miami

Postby VenezuelanPath » Wed Dec 30, 2009 6:58 am

Very nice dude,
Im 20 and broke too haha
And i just dont have the place to even clean my truck

boogyman
Posts: 519
Joined: Tue Jul 04, 2006 6:04 am
Location: Jersey

Postby boogyman » Wed Dec 30, 2009 7:01 am

It looks like you did a good job. The only suggestion would be to have the lights fold and you wouldn't need to have a wind deflector. Plus it would be in the way of your sunroof. I like the blacked out look.

User avatar
GOTGOO
Sponsored Member
Posts: 387
Joined: Wed Dec 24, 2008 9:15 pm
Location: St.Louis, MO

Postby GOTGOO » Wed Dec 30, 2009 7:52 am

Thanks guys! I really dont need a wind deflector cause the wind noise isnt even bad, but i already started making one. Here is the frame i welded up out of some little round tubing it still needs gussets to mount plexi glass over it and brackets to mount it. Oh the sunroof isnt factory so i have about a 1/4in of roof btween the frame and the rubber seal around the sunroof.
Image
Image

User avatar
NVSteve
Sponsored Member
Posts: 1987
Joined: Thu Feb 01, 2007 11:27 am
Location: Salt Lake City

Postby NVSteve » Wed Dec 30, 2009 8:37 am

Nice job! Looks like you used the factory bases? If so, do you have any closeups of how you attached to the factory base? I assume the plastic shell covering the base can be removed, but I've always been curious as to what is underneath-a plastic base, a bit of metal, or what.

KEVSTER
Posts: 401
Joined: Sun Oct 12, 2008 8:21 pm

Postby KEVSTER » Wed Dec 30, 2009 9:12 am

8) Creativety is very good, nice job. I like the older Chevy in garage too. Make sure you clean up spare wheel/tire befor you do a permanent mount on top, was dirty. I have thought about removing my whole rack and painting the rails black,cause my truck is black.

bbermann
Posts: 117
Joined: Mon Feb 11, 2008 7:05 am
Location: Illinois

Postby bbermann » Wed Dec 30, 2009 9:45 am

Nice rack!

I would like to do something similar but just with two Yakima size crossbars embedded in the existing Pathfinder rails. By using round crossbars I can then fold back the snowboard racks when not in use. Any details as to how you made this would be helpful and appreciated.

Thanks

User avatar
GOTGOO
Sponsored Member
Posts: 387
Joined: Wed Dec 24, 2008 9:15 pm
Location: St.Louis, MO

Postby GOTGOO » Wed Dec 30, 2009 1:06 pm

NVSteve wrote:Nice job! Looks like you used the factory bases? If so, do you have any closeups of how you attached to the factory base? I assume the plastic shell covering the base can be removed, but I've always been curious as to what is underneath-a plastic base, a bit of metal, or what.
Thanks! Yes, the two side rails are totaly factory along with the plastic ends and the middle post. Well there plastic bases you can see one of the pics has the covers off and if you mean on the roof whats underneath its metal like the rest of the roof with some holes where it bolts down.
KEVSTER wrote: Creativety is very good, nice job. I like the older Chevy in garage too. Make sure you clean up spare wheel/tire befor you do a permanent mount on top, was dirty. I have thought about removing my whole rack and painting the rails black,cause my truck is black.
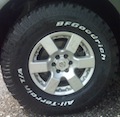
Thanks! Yes thats my Dads 1962 Impala its been in the family since new. LOL man you sound like my Dad its been up there a week and its still dirty.... Dont worry i'll clean itsome day, but the weathers been crappy. I say do it I love mine black and without the letters now!

User avatar
GOTGOO
Sponsored Member
Posts: 387
Joined: Wed Dec 24, 2008 9:15 pm
Location: St.Louis, MO

Postby GOTGOO » Wed Dec 30, 2009 1:27 pm

bbermann wrote:Nice rack!

I would like to do something similar but just with two Yakima size crossbars embedded in the existing Pathfinder rails. By using round crossbars I can then fold back the snowboard racks when not in use. Any details as to how you made this would be helpful and appreciated.

Thanks
Thanks! Well i started by mounting the 90* anlged steel pieces to the side rails being sure they were perfect and mounted back on my pathy. Then took measurements and cut out two cross pieces of the same steel. When i took it back off i laid it on the garage floor with the back mounts up against a flat strip of 1/4in steel i knew was true to give me a measuring point to keep it square. Then i clamped both cross pcs at all four corners and took what seemed like 200,000 measurements to make sure all the holes would line up and be true. Then i welded all the corners together then checked for trueness again and i welded in two round electrical conduit cross bars and then i test fitted it. It fit perfectly! Then i welded in the rest of the cross bars i think there were 9 of them total all spaced perfectly apart. That covers most of it i have some pics on my cell i'll try and post soon.
(Edit here are two earlier pics from my cell)
Image
Image

radudel
Posts: 20
Joined: Mon Aug 24, 2009 4:09 am
Location: Otopeni, Romania

Postby radudel » Thu Feb 18, 2010 4:05 pm

Hello!
I've been serching for some time this ideea to become true. But do you have the finalized rack's pictures? I am interested how you finished it on the interior of the rails.
I need some detailed pictures with the most hard-to-build parts. Thanks!

User avatar
GOTGOO
Sponsored Member
Posts: 387
Joined: Wed Dec 24, 2008 9:15 pm
Location: St.Louis, MO

Postby GOTGOO » Fri Feb 19, 2010 4:23 pm

radudel wrote:Hello!
I've been serching for some time this ideea to become true. But do you have the finalized rack's pictures? I am interested how you finished it on the interior of the rails.
I need some detailed pictures with the most hard-to-build parts. Thanks!
Well the first pic is for the most part the finished product minus the wind deflector which is not complete because i don't like the cold lol. Sorry, but can you be a little more descriptive on what you mean by "finished it on the interior of the rails.". What do you want detailed pics of and i'll see what i can do.

radudel
Posts: 20
Joined: Mon Aug 24, 2009 4:09 am
Location: Otopeni, Romania

Postby radudel » Fri Feb 19, 2010 10:25 pm

Let's start from the original rails the Pathy is coming equipped with from factory.
Then you attached the rack to it on the interior, between them. Have you fixed it with screws or welded directly to the rail?

Those details I need!
Thanks!

User avatar
GOTGOO
Sponsored Member
Posts: 387
Joined: Wed Dec 24, 2008 9:15 pm
Location: St.Louis, MO

Postby GOTGOO » Fri Feb 19, 2010 10:49 pm

radudel wrote:Let's start from the original rails the Pathy is coming equipped with from factory.
Then you attached the rack to it on the interior, between them. Have you fixed it with screws or welded directly to the rail?

Those details I need!
Thanks!
Well its bolted to two factory holes on each side then a bunch of self tapping screws. Since the angled steel is straight and the rails bow not all the holes line up. When i put the self tappers in i went between the holes on the steel so i didnt have to use washers and they seem stronger when tapped through both pieces. Hope this helps you if you have anymore questions i'm glad to help.

KJC
Posts: 1
Joined: Wed Jul 16, 2014 11:46 pm
Location: South Africa

Postby KJC » Thu Jul 17, 2014 12:13 am

Hi there, i am interested to know where you ran your electrical wires for you roof rack mounted lights, did you drill a hole into the roof of the vehicle and feed them under the roof lining and down the door coloumb.
thanks Kevin


Return to “2005-2012 Pathfinder (R51)”