Sound damping and insulation in the Pathfinder

**** PLEASE USE SUBTOPICS BELOW FOR NEW TOPICS ****

Moderator: volvite

User avatar
ShipFixer
Posts: 772
Joined: Sun May 24, 2009 9:52 am
Location: San Diego, CA

Sound damping and insulation in the Pathfinder

Postby ShipFixer » Mon May 02, 2011 10:03 am

Something that's always annoyed me about my Nissans is how loud they are compared to their competitors. It's never stopped me from buying them (five out of six have been Nissan/Infiniti, with one Honda foisted upon me by my dad), but man...my last Sentra made it difficult to hold a conversation on the highway. I had a J30 that was very quiet and had a terrific stereo setup, and I missed that a great deal when I traded it in.

So I discovered sound damping and insulation. Not that this stuff is a huge secret, but most people never do it. Since it quieted down my '01 Sentra a great deal, it's now something I kinda have to do.

The road sound that's bothered me the most from my Pathfinder has been the thundering, booming noises from the wheel wells with each and every bump that make me feel like I'm driving a tank. Since it's body on frame the culprit isn't hard to find; look to the unstressed body panels...the fenders are tympani like constructs that live to echo and propagate noise. Easily corrected though.

The first part of fixing this was relatively easy and took a few hours. Use rubber damping mats in the fender wheel wells plus a little on the plastic. This takes care of most of the booming noises. Stuffing closed cell foam in the wheel wells and then backing the plastic liners with a foam plus vinyl constraint layer killed a lot of the road noise as well as some of the remaining low frequency booms.

Here's the liner removed, with the foam (Second Skin's "Luxury Liner Pro") along the top. Its chopped up and kind of jigsaw puzzled in to try to match the cavity it'll fit into, and allow the liner to fit back in place:

Image

Here's the liner from above:

Image

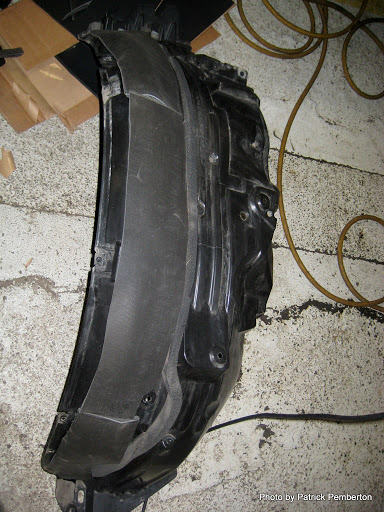
And here's the inside of the wheel well looking directly up, with some of the rubber mat applied:

Image

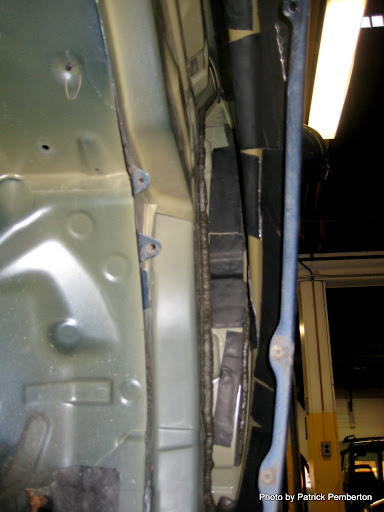
You know where your air filter sticks through the side of the engine compartment? Well, that's what the other side looks like.

My last step was to stuff one inch thick foam ("Overkill") in sheets in that cavity, and in particular along the back of the wheel well where it meets the passenger compartment and door jam. It kind of looks like this:

Image

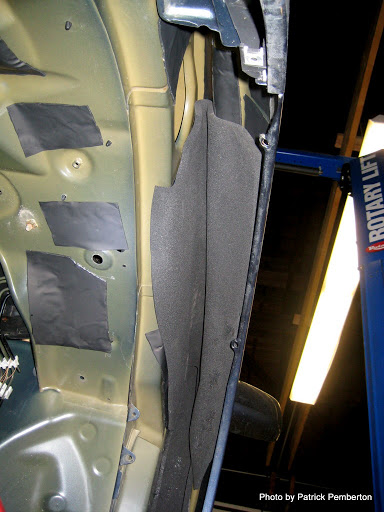
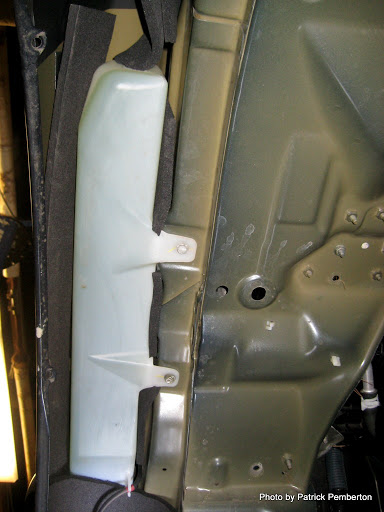
The other side was a little harder because the windshield washer reservoir is stuffed in there. I couldn't see an easy way to remove it in a few hours and I was on the clock in the base auto hobby shop, so I did the best I could.

Image

How did this work? Terrific. This killed most of the booming noise from the front of the truck. (Bilstein replacement shocks improved it beyond that as well.)

The next step was the doors. This isn't so much about noise as it is stereo sound quality. You know how nice speakers are made out of high or medium density wood? Well, thin gauge steel sheets are the opposite of what you want. The outer skin reflects and reverberates with the back wave off your speaker, creating a cancellation wave that makes your woofers sound awful, muddies the base and reduces the "apparent volume." But damping makes it very, very close to something like a wooden enclosure and corrects this. (If you don't do this, I don't see any point in getting an upgraded stereo at all really.)

This part is a little time consuming to pull the doors apart and seal the enclosure. It also uses a lot more matting...the ideal end state is a damped and sealed door that dynamically resembles a heavy wooden box. I also put a sheet of foam along the outer skin to absorb and diffract what back wave is left.

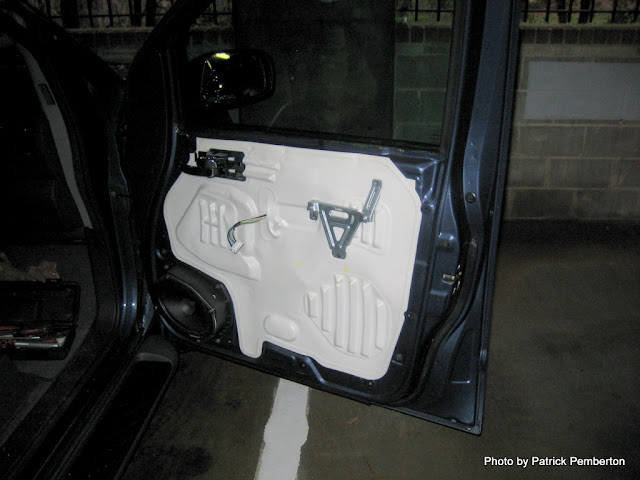
Here's what it looks like from the factory:

Image

And if I'd taken a picture of it when I was done, I'd have inserted it here :-)

This made a much bigger difference in my Sentra, but it still helps the truck out a lot. The stereo is much cleaner, and you don't need to raise the volume as much as before as the speakers become more efficient. Aside from sharpening the sound, the most obvious changes are not having to adjust the volume as much for road noise and not losing volume when you lower the windows.

The rear half of the truck takes the most work, as taking out two rows of folding seats is a lot tougher than a Sentra interior and trunk.

Here's how it looks naked:

Image

Image

Image

Image

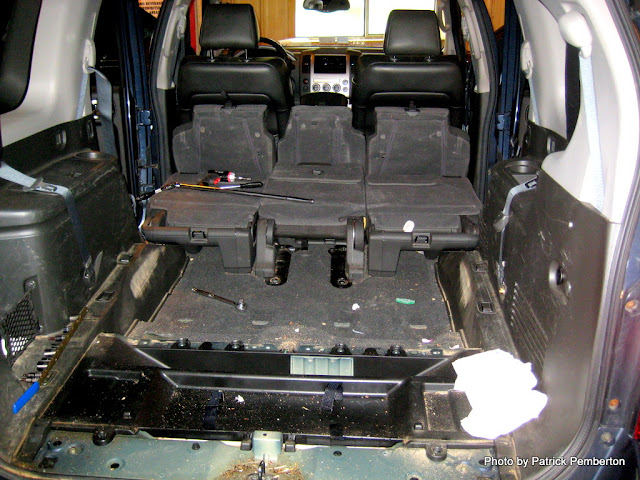
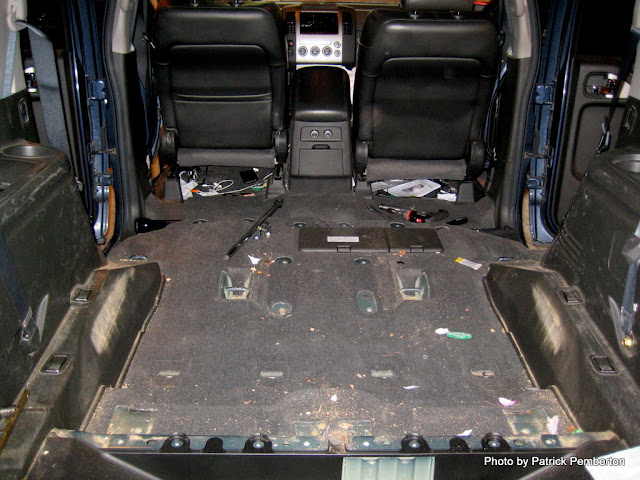
That thick black rubbery stuff is the factory damping...which is better than nothing, but sucks.

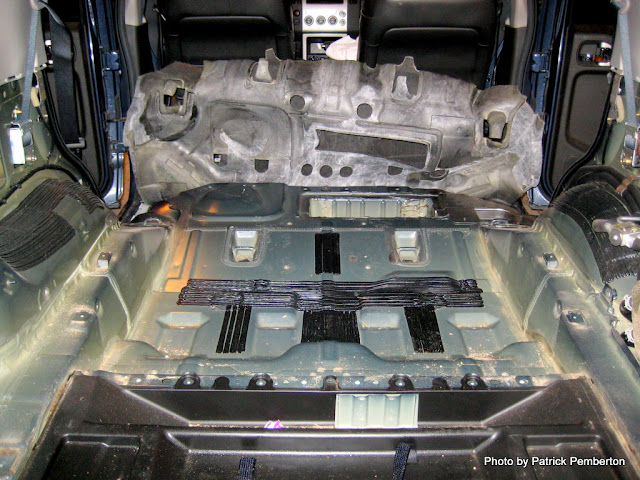
Normally at this point I would lay sheets of damping all over the floor board plus foam, but I didn't have enough material for that or nearly enough time.

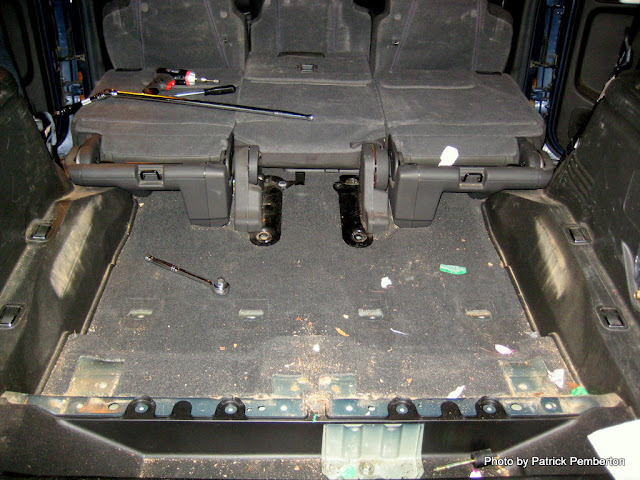
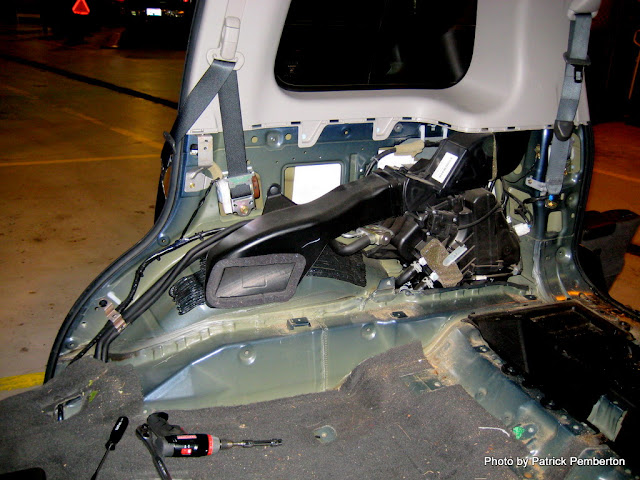
So with what I had, I attacked the next worst offenders in the truck...the rear wheel wells. Once you get the side plastic off they're pretty easy to do though. This is what they look like:

Image

Image

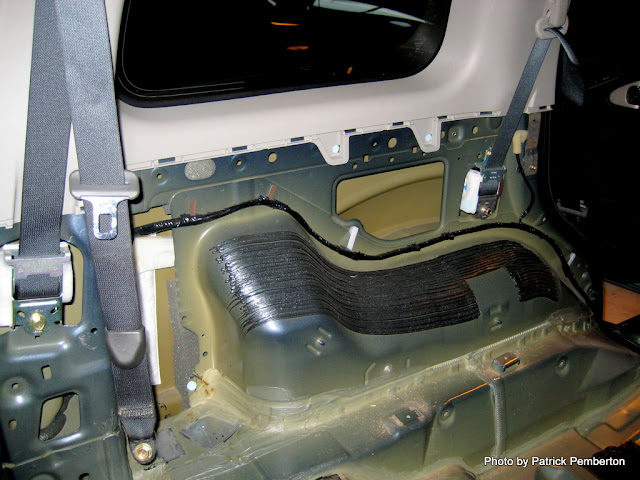
I lined both of those with matting inside the quarter panel itself and along the top of the wheel well. Then I adhered foam sheets to the fender wall (for noise and to replace this cheesy Nissan cotton insulation behind the A/C unit) and again stuck Luxury Liner Pro along the top of the arch.

For the last bit, I also lined and insulated the tailgate. A lot of road and exhaust noise in SUV's comes through it.

Then I buttoned it all up and voila...it's no luxury car but it's much, much quieter. Vehicles damped and insulated still sometimes seem loud if you don't know things have changed. But this one sounds like a sedan going over bumps now (and drives like one thanks to Bilstein)...that change is tremendous for a Pathfinder. And the road noise is much lower, and the stereo is much, much cleaner. I also don't have to raise my voice for my hands-free stereo phone setup.

If I weren't going overseas soon, the things I'd like to do are damp the hood and roof (kills rain noise and cleans up mid-base further still) and fully damp and foam the floorboards up to the firewall. Reducing one noise source generally makes the others more apparent, so now the high frequency tire and wind sounds are a little more noticeable.


User avatar
mar1
Sponsored Member
Posts: 1043
Joined: Fri Jun 19, 2009 9:08 am
Location: Ca

Postby mar1 » Mon May 02, 2011 12:05 pm

nice writeup

Rogue9
Posts: 122
Joined: Mon Sep 20, 2010 12:10 am
Location: Vancouver, Canada

Postby Rogue9 » Mon May 02, 2011 12:10 pm

how much is all the material you're putting in?
weight I mean.
the foam I know about what it would weigh, but what about that rubber mat stuff?

User avatar
ShipFixer
Posts: 772
Joined: Sun May 24, 2009 9:52 am
Location: San Diego, CA

Postby ShipFixer » Mon May 02, 2011 5:49 pm

I'm not completely sure how much I used since some of it was leftover "pro" damplifier that weight 0.6 lbs/sq ft from the Sentra and some of it was new material that weighs 0.35 lbs/sq ft. If I had to guess I'd say I've used 120-140 sq ft and added roughly sixty pounds of rubber and twenty or birth pounds of the luxury liner stuff. The latter is really pretty hefty at 1.6 lbs/sq ft and I have three sheets in there in addition to the plain foam. (It's the old kind they don't sell anymore that had the vinyl bonded to the foam.)

I put maybe 100 lbs total in the Sentra and it was noticeable driving, but no more than having a passenger. Not noticeable at all in a nearly 5,000 lb truck :-)

I put the highest concentration in the doors to help the stereo speakers, so they do feel a little heavier. But not so much as to stress the hinges. They also shut solidly like a luxury car's would.

I only added five or six pounds to the tailgate since I don't seal it as I would the other doors and only put material on the outer metal, but it is a little more reluctant to lift up on the hatch struts now. I predict I'll be replacing those soon anyway since they were getting a little lazy...

Overall, I'm not going to go crazy damping the truck like I did the Sentra. Outside of the doors it just doesn't take that much to get nearly all of the benefits you'll get from damping. And, uh, it takes forever to cover the interior completely! I just start the layer in the center of mass of the metal sheet and go till tapping on it returns a "dead" wood like sound rather than a ping or other metallic noise.

User avatar
volvite
Sponsored Member
Posts: 2180
Joined: Wed Feb 16, 2011 5:06 pm
Location: Hill AFB, Utah West Point UT

Postby volvite » Wed May 04, 2011 12:13 pm

Nice write up. Looks like you took some time to do this. How long would you say it took?

User avatar
ShipFixer
Posts: 772
Joined: Sun May 24, 2009 9:52 am
Location: San Diego, CA

Postby ShipFixer » Wed May 04, 2011 4:19 pm

volvite wrote:Nice write up. Looks like you took some time to do this. How long would you say it took?
Each door took three or four hours. Getting them apart the first time took some figuring out, and then completely sealing them took some work. I did one a night spread out over a few weeks. Did the front two pretty close together though since that would make unbalanced sound a little more obvious.

The front fenders took three hours total to do both. Most of that time was disassembling the plastic; I'd never done this vehicle before so there was some learning in there. Also takes time to figure out where you can fit foam or vinyl on the wheel well liners so they'll still fit into the body. Some parts of them are right along the metal so it's a puzzle.

Disassembling and reassembling the rear interior and damping/foaming what little I did took six hours. And that was moving *fast* with a breaker bar, a socket, a socket/crescent thing and a 4V power screwdriver. (If you're ever wondering, those bolts for your seats are among the toughest I've broken on my truck, mostly due to corrosion of course.) If I were to do everything I wanted I'd add at least three hours to figure out the damping and foam puzzle on the floor all the way up to the front seats.

The rear hatch was the easiest part. Maybe 45 minutes because it has giant holes in the inner sheet and I wasn't trying to seal it. I had it well damped and a great foam barrier in place pretty quickly. Took some time to get back in place overhead though, those little clips were a little tricky to align properly and couldn't just be jammed in.

Now that I'm back in DC where the roads are utterly craptacular, I can say it's completely worth it though. The thundering herd of horses that always seemed underfoot while crossing the 14th Street Bridge are mostly gone, and there's this very muted "thup-thup" noise when I go over gapped expansion joints. I'm actually pretty impressed at how Camry-esque it sounds on the highway, although I know from experience that this thing is probably quantitatively quieter now :-D

Oh...and I took it on a rutted gravel road mountain biking this weekend and it just plowed through without sounding like it was getting beaten to death. Much, much, much quieter. Pretty much what I think a big truck should sound like going over trivial terrain!

User avatar
ShipFixer
Posts: 772
Joined: Sun May 24, 2009 9:52 am
Location: San Diego, CA

Postby ShipFixer » Wed May 04, 2011 4:24 pm

Oh...I should add that if I had a subwoofer like the Bose system behind one of the rear quarter panel plastic things, I would damp that cavity like mad. Mostly seal it but leave some breathing ports away from the cone itself like an actual subwoofer compartment...

User avatar
volvite
Sponsored Member
Posts: 2180
Joined: Wed Feb 16, 2011 5:06 pm
Location: Hill AFB, Utah West Point UT

Postby volvite » Wed May 04, 2011 6:42 pm

Too bad you are not closer or I'd pay you to do mine. :D

aadadams
Posts: 179
Joined: Sun Jan 16, 2011 8:51 pm

Postby aadadams » Thu May 05, 2011 6:47 am

volvite wrote:Too bad you are not closer or I'd pay you to do mine. :D
I live in Burke VA, and I'm sure the OP recognizes that city. I was thinking the same thing. Would you be interested in going commercial? If so, how much would you charge to do this job on my 05? We need to talk ShipFixer?

User avatar
ShipFixer
Posts: 772
Joined: Sun May 24, 2009 9:52 am
Location: San Diego, CA

Postby ShipFixer » Thu May 05, 2011 9:20 pm

If I weren't running out of time in the US, I'd think about it! I'm leaving the country in June though so I don't have many free weekends. I can offer advice and maybe help get you started though.

It's really not hard, the most time consuming part is removing all of the plastic bits. After a while you stop worrying about breaking them...most of them are really well secured in place...

valenburg
Posts: 85
Joined: Wed Nov 11, 2009 6:16 am
Location: Maine

Postby valenburg » Fri Jun 10, 2011 6:45 pm

How much space do you think is in the back of those rear wheel panels. i also have the rear a/c but have been thinking of throwing an 8" or 10" subwoofer (if it will fit) and mounting it in one of those panels to supplement a system I may want to try and throw in this summer. Good look in your OCONUS adventures.


Return to “2005-2012 Pathfinder (R51)”