Please Help with plastidippin
Moderator: volvite
Please Help with plastidippin
I tried plastidipping the front grill this past weekend, and it didn't turn out too good for me. For some reason I'm left with smooth parts and rugged parts. All the ones i've seen here have a smooth paint looking finish to it. Mine look like the palm of a mechanic glove!! What am i doing wrong? Am i not waiting long enough in between coats? Am i over spraying those areas i get the rugged finish? Any tips (time between coats, spray pattern, technique) or help would be greatly appreciated!
Re: Please Help with plastidippin
Really guys?? 21 looks and not one comment?jjrivas wrote:I tried plastidipping the front grill this past weekend, and it didn't turn out too good for me. For some reason I'm left with smooth parts and rugged parts. All the ones i've seen here have a smooth paint looking finish to it. Mine look like the palm of a mechanic glove!! What am i doing wrong? Am i not waiting long enough in between coats? Am i over spraying those areas i get the rugged finish? Any tips (time between coats, spray pattern, technique) or help would be greatly appreciated!
Re: Please Help with plastidippin
Patience, lad. I've been plasti-dipping the last 2 weekends, albeit nothing automotive related. All I have been seeing is more of a rough/matte looking result. Maybe try a can of the glossy coat on top?jjrivas wrote:Really guys?? 21 looks and not one comment?jjrivas wrote:I tried plastidipping the front grill this past weekend, and it didn't turn out too good for me. For some reason I'm left with smooth parts and rugged parts. All the ones i've seen here have a smooth paint looking finish to it. Mine look like the palm of a mechanic glove!! What am i doing wrong? Am i not waiting long enough in between coats? Am i over spraying those areas i get the rugged finish? Any tips (time between coats, spray pattern, technique) or help would be greatly appreciated!
Re: Please Help with plastidippin
Thanks Steve! I appreciate the response. That's what i am getting, but i've seen guys here that have done and it looks smooth and nice. I'd like to try and achieve that. That's why i am trying to see if those same guys can help out.NVSteve wrote:Patience, lad. I've been plasti-dipping the last 2 weekends, albeit nothing automotive related. All I have been seeing is more of a rough/matte looking result. Maybe try a can of the glossy coat on top?
-
doctahjones
- Posts: 844
- Joined: Tue Nov 16, 2010 11:08 am
- Location: aurora, co
i've done or been a part of 3 sets of plastidiped rims.
my advice is:
-a bunch of lights coats (5+), with AT LEAST 5-10 minutes in between
-be sure and wash your rims before hand
-make sure you're under like 60% humidity and below 90F. also don't do it in direct sun.
-don't spray too close. they say 12in, but that never seemed to even coat what i was spraying. i say no closer than 4-6in.
while my tips probably aren't stamped on the can, those are the conditions i've always done them in and not had problems.
always smooth the exception of when i did my lower lip/plastic skid plate. i was going fast and heavy and it's a little bumpy.
i have two threads in this section about doing rims and my front lip. should give you an idea of the coat weights per pass on the rim one.
-
doctahjones
- Posts: 844
- Joined: Tue Nov 16, 2010 11:08 am
- Location: aurora, co
Re: Please Help with plastidippin
oh yeah, and like steve said, be patient. we're not all on here 24/7, and there's few that have experience with plastidip. so many might be looking to see what you're asking, as they might just have the same question....jjrivas wrote:Really guys?? 21 looks and not one comment?
Re: Please Help with plastidippin
That's why I'm here.doctahjones wrote:they might just have the same question....
Looking to do grille, side panels and emblems.
I painted some doors over the last 2 weekends. Both times in direct sunlight and about 107F on the porch. I wasn't going for looks though. 4-6 inches is right on the money, otherwise it seems to go everywhere else aside from what you are trying to paint.doctahjones wrote: -make sure you're under like 60% humidity and below 90F. also don't do it in direct sun.
-don't spray too close. they say 12in, but that never seemed to even coat what i was spraying. i say no closer than 4-6in.
I've seen your work, and that's the look i'm looking for. I appreciate all the tips. I think my mistake was that my coats where too heavy. I allowed enough time in between them, but i sprayed too much and that might be the reason why i am getting the rough patches. I will try again this coming weekend and post pictures of the results. IF I CAN FIGURE OUT HOW TO POST PICS. I am new to this forum...doctahjones wrote:i've done or been a part of 3 sets of plastidiped rims.
my advice is:
-a bunch of lights coats (5+), with AT LEAST 5-10 minutes in between
-be sure and wash your rims before hand
-make sure you're under like 60% humidity and below 90F. also don't do it in direct sun.
-don't spray too close. they say 12in, but that never seemed to even coat what i was spraying. i say no closer than 4-6in.
while my tips probably aren't stamped on the can, those are the conditions i've always done them in and not had problems.
always smooth the exception of when i did my lower lip/plastic skid plate. i was going fast and heavy and it's a little bumpy.
i have two threads in this section about doing rims and my front lip. should give you an idea of the coat weights per pass on the rim one.
-
doctahjones
- Posts: 844
- Joined: Tue Nov 16, 2010 11:08 am
- Location: aurora, co
pics aren't hard. you have to have the pics uploaded somewhere else first. once they're uploaded (even to facebook) right click on wherever the picture is uploaded to and "open image in a new tab". i use chrome as my browser, so your wording my differ a little.
then copy the picture url (highlight the whole http://blablahblahb.blah.com/blahimage.jpg text from the address bar) from that newly opened tab/window.
then come back here and start making your post. when you get to a section you want your picture, hit the "img" button that's above this textbox where you type your post. it should put a [ img ] in this text box. paste your photo url after that, then hit the img button again and it should put a [/ img ] tag. continue typing and if you want another image, then repeat the steps (but go grab the url for your next picture).
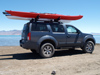
Ok, finally here are some pictures of my little project. I've got to thank doctahjones because his tips were right on the money. I used 4-5 VERY light coats on the smaller parts and 5-6 on the grill and the long silver part in the back. I'm pretty happy with the results. The only thing that i can add that worked for me was that i used a fast side to side motion and sprayed in small burst while doing that motion. That helped me avoid any over spraying because it kept me from spraying long enough any particular part. Next up are the rims. I will post some more pics once the rims are done and the grill is back on the path.
On a side note I've also added the rancho quick lift, rancho spacers and rancho RS9000XL on the back.


On a side note I've also added the rancho quick lift, rancho spacers and rancho RS9000XL on the back.

Find Your Forum!