After install of my Clarion CX609
Posted: Wed Jun 30, 2010 9:51 am
I had a request for seeing the CX609 installed. So sorry I didn't get any "during install" pics. The CX609 was a breeze to install. The only splicing was between the head unit's plug and the PF wiring adapters Crutchfield provided. There was also some splicing (3 wires) with the PAC steering wheel controls module (plus some programming). At first it seemed overwhelming, but as I went step-by-step - not too bad. Took about 2 hours to do cleanly.
The only issue I had with installing was the head unit has 6 built-in wires coming out the back right in the middle top to bottom (the rest are plug-ins on the lower area). The bundle of RCA jacks (for an amplifier if you have one) is mounted to the units frame with a post that sticks out @ 1/2". This is @ 1/2" too long and it hits a cross-tube behind the dash. So I just unscrewed that post and stuck it down into the frame of the unit and cable tied the wires to the frame to point downwards to the empty area behind the console - there are convenient vent holes already on the frame, so no drilling. All used connectors and whatnot were tucked above the unit, between it and the "coin holder". You can see the wiring here - just click on the pic of the rear of the unit.
http://www.crutchfield.com/App/Product/ ... 09&tp=5684
Here's the PAC steering wheel unit. There's a slight delay when pressing a button, but I like this VERY much over having buttons on my steering wheel that don't do anything...
http://www.crutchfield.com/p_127SWIJACK ... ml?tp=3405
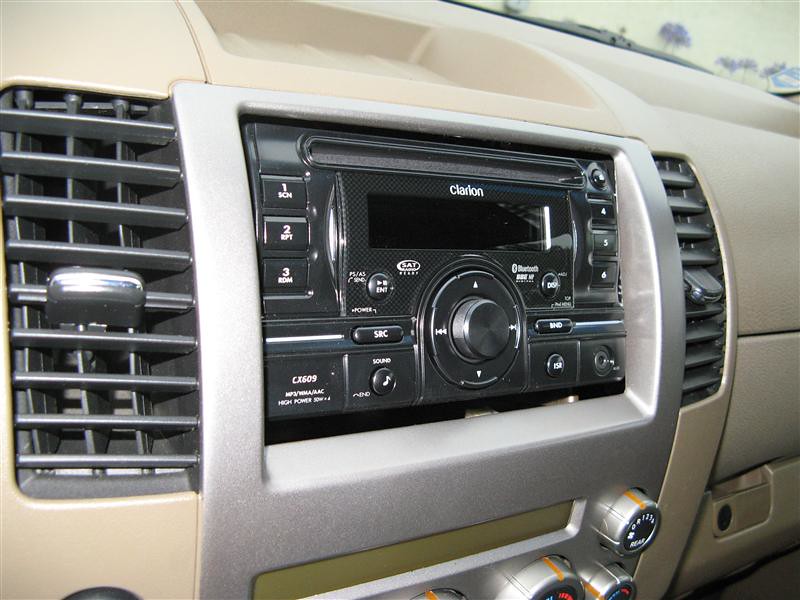
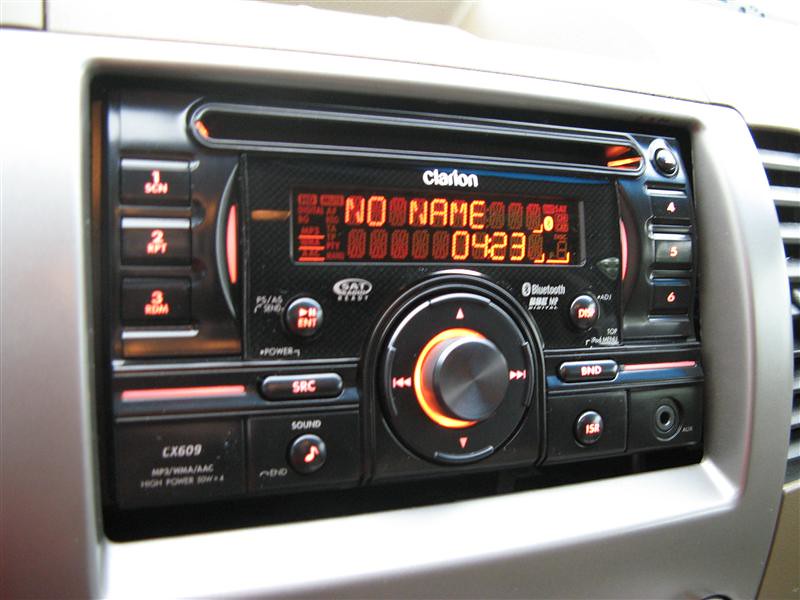
Here are 2 pics of the unit installed. You can see the gap between the unit and the dash. Crutchfield supplied the ring adapter to fill this in, but I don't have the right Torx #20 driver to remove the screws and mount the ring. Will get that done soon. This unit also has the ability to use up to 700+ different colors for it's lighting. When you first power it up it cycles around like a acid-trip light show. Luckily there are also some "default" colors to choose from and I chose this one that closely matches the PF dash lighting color.
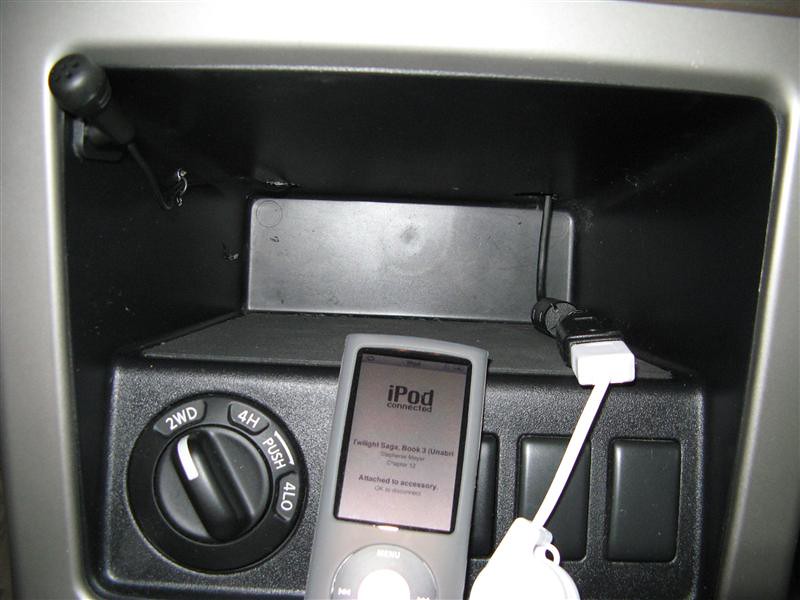
One of the toughest parts was where to put the microphone for the bluetooth phone function and the USB cable for iPod or other USB device. I was hoping the USB cable was long enough to reach back to the console (at the elbows behind the cup holders). But that cable it too short and I didn't want to put in an extension and have a point of failure under the console. And the mic had to be somewhere away from a vent, yet pointing towards your mouth. I though about routing the (plenty long enough) mic wire to the visor. But I don't like the look of something sticking out there. So for both I opted to mount them in the cubby hole above the 4x4/VDC controls. I drilled two holes on the top of the cubby (lots of room above) and routed them down. Since the USB will move somewhat with attaching devices, I left free to move. The mic I wanted hard-mounted. So I also drilled two smaller side holes to zip-tie the wire to the side to help hold in place. The mic has several mounts, I opted for the self-adhesive version to the side. The only thing I had to do is raise the gain of the mic from the default 3 to 4 (5 is max).
So far, loving it all!! But I have to say, some of the manual was a B**CH to understand/follow - translation issues? Especially the bluetooth syncing. But once I worked at it and understood what was happening, it's fairly intuitive and easy to add/remove devices - or many other settings. It was just at times you have to hold down a button for more than 1 second and things like that which the manual doesn't clearly state. But they try...
The only issue I had with installing was the head unit has 6 built-in wires coming out the back right in the middle top to bottom (the rest are plug-ins on the lower area). The bundle of RCA jacks (for an amplifier if you have one) is mounted to the units frame with a post that sticks out @ 1/2". This is @ 1/2" too long and it hits a cross-tube behind the dash. So I just unscrewed that post and stuck it down into the frame of the unit and cable tied the wires to the frame to point downwards to the empty area behind the console - there are convenient vent holes already on the frame, so no drilling. All used connectors and whatnot were tucked above the unit, between it and the "coin holder". You can see the wiring here - just click on the pic of the rear of the unit.
http://www.crutchfield.com/App/Product/ ... 09&tp=5684
Here's the PAC steering wheel unit. There's a slight delay when pressing a button, but I like this VERY much over having buttons on my steering wheel that don't do anything...
http://www.crutchfield.com/p_127SWIJACK ... ml?tp=3405
Here are 2 pics of the unit installed. You can see the gap between the unit and the dash. Crutchfield supplied the ring adapter to fill this in, but I don't have the right Torx #20 driver to remove the screws and mount the ring. Will get that done soon. This unit also has the ability to use up to 700+ different colors for it's lighting. When you first power it up it cycles around like a acid-trip light show. Luckily there are also some "default" colors to choose from and I chose this one that closely matches the PF dash lighting color.
One of the toughest parts was where to put the microphone for the bluetooth phone function and the USB cable for iPod or other USB device. I was hoping the USB cable was long enough to reach back to the console (at the elbows behind the cup holders). But that cable it too short and I didn't want to put in an extension and have a point of failure under the console. And the mic had to be somewhere away from a vent, yet pointing towards your mouth. I though about routing the (plenty long enough) mic wire to the visor. But I don't like the look of something sticking out there. So for both I opted to mount them in the cubby hole above the 4x4/VDC controls. I drilled two holes on the top of the cubby (lots of room above) and routed them down. Since the USB will move somewhat with attaching devices, I left free to move. The mic I wanted hard-mounted. So I also drilled two smaller side holes to zip-tie the wire to the side to help hold in place. The mic has several mounts, I opted for the self-adhesive version to the side. The only thing I had to do is raise the gain of the mic from the default 3 to 4 (5 is max).
So far, loving it all!! But I have to say, some of the manual was a B**CH to understand/follow - translation issues? Especially the bluetooth syncing. But once I worked at it and understood what was happening, it's fairly intuitive and easy to add/remove devices - or many other settings. It was just at times you have to hold down a button for more than 1 second and things like that which the manual doesn't clearly state. But they try...