OME Suspension Upgrade FINISHED
Moderator: volvite

The pictures are showing a good 2" I would say. But I won't know until tonight. Unfortunately because it took so long the minimal amount of rain and snow we have gotten has washed away my registration marks. I should be able to fairly accurately reproduce them though. Off-road will probably have to wait until next weekend. I am heading to connecticut tomorrow afternoon and don't feel like trying to shake down this new suspension on a 3 1/2 hr trip.
Long enough for me to grab a copy. Thanks!blink32 wrote:HERE is a link to it. Not sure how long I will host it though. At-least a few weeks. I was hoping it would be more technical regarding the install.
I'm now looking forward to your on-road report from you short trip. Hopefully the ride isn't too stiff or harsh now. Still looking forward to an off-road report as well, but I have loads of patience.
On another note, I've read that next year's Pathfinder will be going to Bilsteins instead of the Ranchos. I wonder if that means we'll finally see a full kit from them at some point?
-
SilverGhost

- Posts: 321
- Joined: Wed Jan 10, 2007 6:23 am
- Location: Houston, TX
Yep, my finance guy talked me into buying the Nissan Gold Plus Preferred extended warranty to the tune of $1395. How-some-ever, I'm drafting a letter as I type cancelling the coverage. Just doesn't seem worth it in the long run. It'll cost me a $50 cancellation fee, but for $1400 big ones, it's worth the diff.NVSteve wrote:Has anyone purchased any of the extras they offer? If so, do you feel justified by your choice? Just curious.
Well, good news and bad. Everything is in. It took me about an hour and a half start to finish to replace the rear components. Nothing in particular was difficult about this portion. You'll need an array of 19mm and 22mm sockets and wrenches. I found a hammer and a punch handy for massaging things into alignment. Couple of taps here and there to get things going. But again, nothing major. The Nissan Factory Manual tells you to remove the spare tire to do the left hand side. I found it not necessary but would provide more room for power tools. I also will probably not be getting an alignment as suggested. I marked the rear camber adjustment bolts and they didn't move when I loosened them. If I notice issues I will get it checked.
The spring is larger than stock and its a little un-nerving to just put the spring in the cups and start jacking away. The angles are pretty extreme and it seems like the spring could just fly out. I didn't experience any issues though.
The bad. Something is not right in the front end. I thought at first that the suspension just needed to settle in. I heard what sounded like rattling and banging from both sides and I could feel it through the floor. I went over in my head every bolt and nut. I laid back on the ground and looked, felt, and I remember triple checking every nut and bolt. Nothing is loose. I yanked on everything I could to make sure nothing was that loose. There are only 6 connections other than the wheel studs per strut. For a while the noise went away. But then on the way back from my shake down run the noise returned but this time only on the drivers side. I think the springs rotated a bit in the bottom mount towards the stop lip and the end of the bottom coil is now rubbing when the suspension compresses against the perch. Which, unfortunately for me, means I will need to pull that strut out, compress the spring and adjust the location of the spring compared to the perch. I may take the opportunity to disassemble the strut and return the strut rod cover to where it is supposed to be. I will know more on Monday when I return from my trip and start back in on this.
Here are some pictures.
Rear wheel well before and after. The suspension had not had a chance to settle in so its higher than it should be. This is the best "before" shot I had. Sorry its not exactly the same.


Comparison pictures


The whole shebang

I don't really have any feedback on the ride. I was so concerned with the noise that I really didn't pay much attention.
The spring is larger than stock and its a little un-nerving to just put the spring in the cups and start jacking away. The angles are pretty extreme and it seems like the spring could just fly out. I didn't experience any issues though.
The bad. Something is not right in the front end. I thought at first that the suspension just needed to settle in. I heard what sounded like rattling and banging from both sides and I could feel it through the floor. I went over in my head every bolt and nut. I laid back on the ground and looked, felt, and I remember triple checking every nut and bolt. Nothing is loose. I yanked on everything I could to make sure nothing was that loose. There are only 6 connections other than the wheel studs per strut. For a while the noise went away. But then on the way back from my shake down run the noise returned but this time only on the drivers side. I think the springs rotated a bit in the bottom mount towards the stop lip and the end of the bottom coil is now rubbing when the suspension compresses against the perch. Which, unfortunately for me, means I will need to pull that strut out, compress the spring and adjust the location of the spring compared to the perch. I may take the opportunity to disassemble the strut and return the strut rod cover to where it is supposed to be. I will know more on Monday when I return from my trip and start back in on this.
Here are some pictures.
Rear wheel well before and after. The suspension had not had a chance to settle in so its higher than it should be. This is the best "before" shot I had. Sorry its not exactly the same.
Comparison pictures
The whole shebang
I don't really have any feedback on the ride. I was so concerned with the noise that I really didn't pay much attention.
It was too dark last night when I was finished to get a good shot. I'll take that pic today after work though. The suspension has had time to settle in now so it should be lower. Ha. And I believe it still has a decent rake but the picture should clear it up when I finally get it. If I don't post this afternoon I will do it monday when I return.

Your "rattling and banging" description is throwing off any kind of visual I try to create in my mind. My previous vehicle had IS up front, which I had to fully inspect a number of times because of various noises (ended up being the swaybar). It might be a lot to ask, but when you remove the wheels again, could you post a couple of photos from various angles of the front IS assembly? Maybe one of us here might be able to spot something. I realize it's a longshot, but I'd bet that if any of us lived near you we'd be over helping you out in person, so maybe we can help from afar.
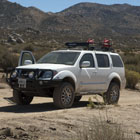
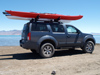
Have you guys seen this thread?
http://www.4x4parts.com/ubbthreads/show ... Post527050
Spacers, yes, but it gives a great example of what the PF will look like with a bit of a lift.
http://www.4x4parts.com/ubbthreads/show ... Post527050
Spacers, yes, but it gives a great example of what the PF will look like with a bit of a lift.

Find Your Forum!