Rear Differential Bushings Torn
Posted: Mon Oct 14, 2024 9:33 am
by AS_The_Crow_Flys
Hi All,
The two differential bushings that are just behind the rear diff are all torn up. So they obviously need to be replaced.
The question is, how painful of a job is this to do and what else should be replaced at the same time?
Bonus if you know which section of the service manual shows the full parts diagram for all the mounting/bushings for the rear diff would be nice as well I have looked in many sections and cannot find the right diagram.
Re: Rear Differential Bushings Torn
Posted: Tue Oct 15, 2024 11:11 am
by AS_The_Crow_Flys
Well it appears that others have not yet encountered this issue. I will post progress and information here for future reference by others. As this is in progress that info may be wrong.
Looks like the removal of the bushings will require the differential to be removed first. (it may be possible to do this without full disassembly? e.g., lowering it out of the way while it stays connected but I don't know yet.
(service manual references) RFD-16 provides instructions (also requires RFD, RSU, RAX BRC sections).
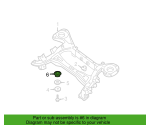
There are two bushings that mount to the subframe and two isolation mounts. Probably replace both of those as well once I am there.
Bushings appear to be part numbers 55470-7S000 (2 per vehicle) currently around 60$ each
Isolation mounts appear to be 55476-AR002 (2 per vehicle) Currently around 120$ each
- 313c3cc14f7e808f7c2942529fcba668.png (6.72 KiB) Viewed 8826 times
Those Isolators sure seem overpriced.... will circle back as i gather more info.
Re: Rear Differential Bushings Torn
Posted: Thu Nov 07, 2024 4:36 pm
by palmerwmd
AS_The_Crow_Flys wrote: ↑Tue Oct 15, 2024 11:11 am
Well it appears that others have not yet encountered this issue. I will post progress and information here for future reference by others. As this is in progress that info may be wrong.
Looks like the removal of the bushings will require the differential to be removed first. (it may be possible to do this without full disassembly? e.g., lowering it out of the way while it stays connected but I don't know yet.
(service manual references) RFD-16 provides instructions (also requires RFD, RSU, RAX BRC sections).
There are two bushings that mount to the subframe and two isolation mounts. Probably replace both of those as well once I am there.
Bushings appear to be part numbers 55470-7S000 (2 per vehicle) currently around 60$ each
eec9a570c9346173e288e9383a44f488.png
Isolation mounts appear to be 55476-AR002 (2 per vehicle) Currently around 120$ each
313c3cc14f7e808f7c2942529fcba668.png
Those Isolators sure seem overpriced.... will circle back as i gather more info.
I certainly havent done that job either yet.
We are grateful for updates and any tips/tricks you may send our way.

Re: Rear Differential Bushings Torn
Posted: Sun Nov 10, 2024 3:40 pm
by TooMuchControl
job is ok. I've done this recently. The isolation mounts/ bushing I left alone.
Only the rear bushings were performed.
1. take the rear driveshaft off (u-joint)
2. remove the rear two axles
3. support the differential using a jack.
4. remove the two upper bushings bolts. They may stick a bit with any corrosion. Spray penetrating fluid.
5. remove the two rear bushing bolts.
6. lower and remove the differential.
7. spray penetrating oil all over the old bushing on the front and back sides inside the carrier.
Bushing: the new one.
I used a caliper and measured the outer metal lip of the new bushing:
58.31 mm inner
62.05 mm outer
I found an impart socket (GearWrench Part #3937) at a Princess Auto (Harbor Frieght). Body of the socket was perfect diameter for it, but I had to cut the front lip of the impact, as it was wider than the rest of the socket. You may find the right socket, without cutting the lip. This was on sale for $5, so cutting it, for me, no biggie.
Tools: Ball Joint removal tool and the socket - pushed out.
Note: this baby will creak when it finally moves! Be prepared for the whole world to shake when it pops loose.
Installation:
clean the old bushing entry with sand paper and steel wool as best as possible. Some corrosion might be there. It's a good step to take your time and do well. The slots for the new bushings need to be primo.
Parts and tools
1. pulley. At my local store, bushing in hand, found a pulley wide enough with the right detent to lay on top of the bushing to push it in, from the backside of the carrier.
2. ball joint tool to press it in, using the pulley on the back side.
The whole thing is a bit tight to make it work, but it will, with this simple setup.
Note that it's a bit difficult to line up with the ball joint tool, as you are installing the bushing, a bit blind. Make sure that you line it up as straight as possible and give it push in. I tapped the pulley a few times ontop of the bushing to start it, on it way.
Make sure to line the new bushings, in, the right way. Match the old bushings.
raise, install differential, axles, and driveshaft.
I spent $20 to do this, as I had the ball joint tool handy. I think you can rent one from an auto store on a load program?
Make sure you support the differential when you undo the rear bolts. It's a bit of a hassle.