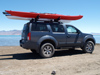
Anyway, my research began immediately looking for a lift for this truck. I plan to do light off roading. My son and I hunt upland birds and waterfowl. We get back into the woods throughout the northeastern states for hunting birds, kayak/canoeing in the summer, and launching our 16' duck boat on many dirt/unimproved ramps in the winter.
After reading lots of information here, talking with the guys at PRG, Rancho and 4x4 parts, I ultimately decided on the height adjustable Bilstein 5100 front shocks, Bilstein 5100 HD rear shocks and 2" spacers. While I have the wheels off and the suspension unloaded I decided to take the opportunity to install the Air Lift 1000 airbags in the rear coils.
Here are some pics along the way. I had some help (also a teaching opportunity) from my son and one of our family friends.
Here she sits prior to the lift:

I marked above each of the wheel wells with blue painters tape and made a mark at a reasonable whole number that fell on the blue tape. In this case, we chose 35" and made a mark.
Front

Rear

Front driver side wheel removed. Suspension in stock configuration.

It was easy enough to unload the springs using my floor jack, but when it came time to get the lift springs installed, there was NO way they were going back in without a coil spring compressor. A quick run to the AutoZone and rented the needed tool. Back in business. Took a little bit of time to get the springs compressed enough. Then we were able to complete the installation.
Front driver side after Bilstein installed at the +2" height. *****NOTE: The strut in this picture is assembled WRONG! Assembling the strut like in this photo will result in an incredibly harsh ride and could be extremely dangerous and I would suspect potentially fatal! DONOT assemble you strut like this. Read down further for correct assembly and correct assembly photos. *****

Had to sacrifice some blood along the way. My hand slipped off the wrench and I cut a couple of fingers pretty good. Got some blood on the new truck. Well, now she is mine for sure.


Driver side rear wheel removed, stock suspension installed.

Factory rear lower spring pad on left. New +1 3/4" lower spring pad on right.

Stock coil spring set into the new lift spring spacer.

Air Lift 1000 airbag installed.

My Pit Crew with the new lift spring spacer installed with the airbag in place and air line temporarily run.

New Bilstein 5100 shock in place. This wraps up the rear install.

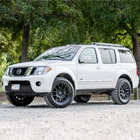
We got both rears done and the front driver side done before it got too dark to keep working. I took some preliminary measurements at the driver side rear. The line previously marked at 35" now measures 37". That puts me at a full 2" lift in the rear. I will not consider that my final height as I still need to finish the front passenger side.
Hope to wrap up the front tomorrow afternoon. Then off to the alignment shop on Tuesday.