I recently was able to fabricate a roof light bar for my 2005 pathfinder, to fit on the stock roof rack mounts just behind the sun roof. With my application I wanted to attach two 10" Rigid Industries LED E-series lights. I could not for the life of me find anyone who sold something like what I was looking to do online, so I came to the conclusion I was going to have to make my own. I thought it would be a HUGE project but it was really easier than I thought and cost me less than 30 bucks and not to toot my own horn, It actually looks pretty darn good
Here's what you'll need if you want to tackle this job.
Tape measure
Drill
Cobalt metal bit 3/8ths
1/8 steel plate, you wont need alot, a 12 inch by 12 inch sheet should take care of the job
38" angled iron, 1/2 inch long and 1/8 to 3/16 thick
6 3/8 bolts (about 1 to 1 1/2 inches in length, they have to fit in the plastic casing and through the bar... you'll see what I am talking about)
A grinder with a metal grinding wheel, also a wire wheel
Cutting torch
Welder
Spray paint
Cardboard
utility knife
So, here we go.
First take the cardboard, just take a square about 6 inches long and 4 inches wide, take the plastic cover off the front of the roof rack. Its held on by 3 plastic clips that might break if your rough on it. Either take a small flat head and pry off, I was able to just use my hand. Pull towards the outside of the car and be careful with the tabs on the back end that go inside the metal bar that says "Pathfinder" those can break off if not careful.


In these photos I already have the bar installed so you wont have any metal inside like I have in mine, that will come later.
Take your piece of cardboard and insert it into the roof rack plastic. This is what you will cut out into a template for your metal profile. mine looked something like this:

your going to end up making 4 cut outs of this template from your metal 2 for the insides of the plastic, 2 for the outside, welded to the bar.


OK, now comes some work.
After you have made the template, make sure it fits and does not stick out to where you cannot put the cover back on now your ready to go. The cardboard should be about the same thickness as your metal, about 3/8ths thick, this will tell you if that metal will be in the way.
now take that template, draw it out 2 on the sheet metal with that rear notch, and 2 without it. The 2 without go on the outside, on the light bar and do not require that notch since there is no plastic in the way on the outside.

and cut out each one with the torch. This will be crude and rough, but you will grind all of the slag and melted metal off during the next process. once the metal has cooled and you have ground down the rough edges, take your template back to the roof rack and stick it in there to make sure it fits, grind off what does not. this took me several tries.
to make the 4 uniform, clamp them together and grind them all at once to make them the same shape and size. use your grinder to angle the edges slightly around the pieces and the wire wheel to clean and soften them.
Now that they have cooled, and have no sharp edges stick them in the plastic roof rack and make sure they fit. The 2 with the notches will go inside the cover and the other 2 will go outside.
If everything fits and looks good (no metal showing through the looped hole outside the car)
your ready to drill some holes.
mark where you will put the holes carefully. I put 3 holes in each of the pieces with the 3/8" cobalt bit using wd-40 as the lubricant as to not heat my bit so it breaks ($8.99 a bit where I was at) the way I figured where to put them was actually placing them in the roof rack plastic and marking the metal where I thought it would support the weight the best.

you want them all to be in the same place and to line up together... this is what holds the outside of the bar to the inside without cracking that plastic.
, There was a bit of plastic on the roof mount that I had to drill out to make the bolts fit, but it was minimal and has had no impact on the strength on the Nissan part (as far as I can tell).

After this I went ahead and drilled the 3 holes in the plastic, making sure the metal was in the plastic, was not interfering with the plastic cover and everything fit. you mess this up, your messing up your pathfinder :/
OK, now you need your angle iron. The inside measurements for my vehicle were 37" from end to end. the angle iron i found was 38 inches so that was perfect. The metal you stick on the outside of the angle iron ( the metal you cut out without the notches) will also take up about 1/4 inch of space so you will have to cut and grind the angle iron so it fits with those two metal pieces.
once you have fit everything and it looks good, make note of the bars height to the roof, mine has 1/4 inch clearance, mark where the bar should go and weld the angle iron on both ends on there. before you make a complete weld, first put one small spot weld on each mounting bracket in case you need to break that weld to make any adjustments.
I was pretty much forced to put an angle on the iron to make it "<" and not "L" because my yakima only gave me half an inch of room for my lights to fit. It ended up being good that its at an angle, it allowed me to hide my wiring inside of the metal.


once you have verified that the bar will fit in the roof rack mounts, and that the height and angle are where you want it to be, finish welding the mounts to the light bar. make sure you do some SOLID welds, this will hold some important/expensive hardware and will be hit with wind resistance as well as vibrations. As for the light mounting brackets, I fabricated my own, as i could have easily could have purchased some from Rigid. I took their design and just made it with the left over scrap metal I had from the bar mounting brackets, my build required 4 light mounts. I used the measurements of the 10 inch lights to base where the center of the bar was and the distance between each light. (I did not have the lights when I welded this together, when I got home it all fit together very well)
The easy part will be coating it with a few coats of paint, I used black spray paint, 5 to 6 good coats.
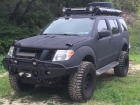
This is the finished product

To mount the light bracket, I simply put 3 bolts, 3 lock washers, and 6 nuts per side total 6 bolts 12 nuts.
Then replace the covers.
If there is anything I have not covered or you have any additional questions please feel free to message me or ask me on here, Ill be more than happy to help.
-HydroPonix-